The Basics of Marine Fresh Water Cooling Systems


| Description | Capacity | Galley Heaters | Installation Time | Filling & Flushing |
| Start Up | Antifreeze Ratio | Warranty | Returns | Diagram |
| Freezing Point |
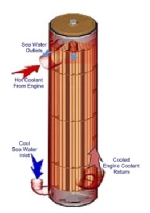
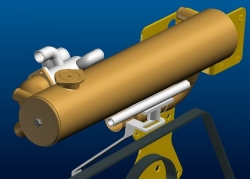
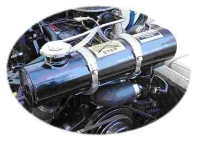
Heat exchanger
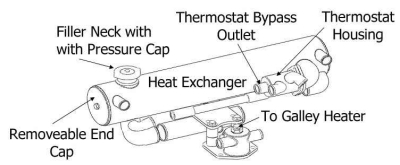
High-flow, shell and tube design allowing a higher cooling capacity than standard. All copper alloy construction made to the highest industry standards. Reinforced removable clean-out covers are installed on both ends of heat exchanger.
Cooling system capacity
Will maintain coolant temperatures in the 160-170 ° F range using 160 ° F thermostat included in kit. System has cooling capacity safety margin higher than industry standards.
Galley water heating
Heaters such as galley water heaters and cabin heaters are easily supplied with hot water. Most of our kits utilize a 3/8” NPT fitting on top of the lower heat exchanger bracket to supply the heater inlet. When the 3/8” NPT fitting is supplied, instructions for the hook-up of the heater are supplied in the kit installation instructions.When no 3/8” NPT fitting is available, the heater inlet can be supplied by teeing off the heat exchanger bypass line. The outlet to the heater should be connected to a fitting on the engine-circulating pump (normally a ½” NPT thread).
Installation time
Average installation time is approximately 1-4 hours, assuming new engine and normal accessibility. Allow additional time for filling and testing. Installation skills are not beyond those of most do-it-yourself boat owners. Complete illustrated installation instructions are included in kit. Ordinary hand tools used, however a hose cutting tool, pipe thread and gasket sealant, and a mild thread locker is recommended.
General fill & start up
Double check installation
Before filling double-check entire installation. All fasteners, fittings, and hose clamps must be tight. Make sure engine drain plugs are in place.
Initial filling and flushing
An initial fill and flush is recommended, although not necessary for a brand new engine. This fill is to check the system for leaks and to help remove any sediment that remains in spite of the cold-water flush that was performed as part of the installation. For engines that have been previously cooled with raw-water, the flushing is critical. For more information, see the section on silicate dropout in the antifreeze section of these instructions.
The system should be filled with clean soft water. If local tap water is hard, we recommend distilled water, or drain water from air conditioners or dehumidifiers. Fill slowly through filler neck on top of the heat exchanger until completely full. Be careful not to damage the gasket surfaces of the filler neck with hose or tools.
Start-up dockside
Make sure that engine has normal raw-water supply. Start engine(s) and run at idle. Periodically during warm-up, check temperature of exhaust elbow(s) by touching them with your hand. The elbow(s) should rise in temperature equally.
If elbow(s) is too hot, stop immediately and investigate reason for insufficient raw-water supply. See troubleshooting instructions.
Upon start-up, water level will drop as trapped air from inside engine block is expelled through filler neck. Continue to fill to maintain water level until most of the air has escaped. This should only take a couple of minutes. Fill completely to top of filler neck and put pressure cap on.
Fill (plastic) expansion tank half full and continue running until system is fully warmed up to thermostat opening temperature (usually 160°F). Gunning the engine a few times during this warm-up period will increase jacket water flow rate and help expel air. As air bubbles disappear in clear tubing leading from the heat exchanger to expansion tank add enough water in expansion tank to fill it to its normal level (approximately 2/3 full).
Check system over to make sure there are no leaks.
Test run
If everything appears to function properly, take boat for a test run.
Gradually and in steps, increase power while observing temperature gauge. Temperature may increase slightly from those at idle level. When throttling very quickly from full power back to idle a temporary temperature increase may be observed.
If temperature is too hot (above 185°F), stop immediately and investigate reason for insufficient raw-water supply. See troubleshooting instructions.
If temperature on temperature gauge appears abnormal, make sure that the gauge is accurate before taking additional steps. Electric type temperature gauges are frequently inaccurate. See troubleshooting instructions.
Final flush and fill
If everything functions normally, return to dock, stop engine(s) and let cool down. After complete cool down, drain and flush system completely.
If engine is old , it may be desirable to keep the engine operating for some time with only clean distilled water. See the section on silicate dropout in the antifreeze section of these instructions. Periodically during the season, repeat the draining/flushing procedure before converting to correct antifreeze solution.
If engine is new, or the engine has been properly flushed , refill system with antifreeze and repeat start-up procedures. If clean soft water is not readily available, consider using a 50% premix antifreeze solution.
When system is hot, correct coolant level in expansion tank is approximately 2/3 full. Whatever the drop is, mark it on the expansion tank. If system when cool is lower than normal, it indicates a coolant leak. If level is higher, it may indicate that air instead of coolant sucked back from expansion tank. Either condition should be corrected. See troubleshooting instructions.
Antifreeze coolant
As a permanent coolant on the freshwater side, use an antifreeze solution of sufficient strength to handle the lowest temperature that could be expected during winter lay up. Use at least a 10% solution of anti-freeze. Do not exceed 50% antifreeze strength. MONITOR recommends the use of a 1/3 solution if possible. We recommend that you use distilled water especially if your local tap water is hard.
If the percentage of antifreeze is less than 1/3, add additional corrosion inhibitor.
Antifreeze solutions provide some corrosion protection for the engine. However, solutions less than 1/3 anti freeze do not have sufficient corrosion protection for maximum engine life. For that reason, if the percentage of antifreeze is less than 1/3, add additional corrosion inhibitor.
DO NOT USE PROPYLENE GLYCOL BASED ANTIFREEZE.
PPT/MONITOR recommends the use of an “Extended Life”, “Low/non Silicate” anti-freeze such as DEX-COOL ® .
To prevent “silicate dropout”, PPT/MONITOR recommends the use of any antifreeze that meets the General Motor’s Extended Life Coolant Specification (DEX-COOL®). These antifreezes are readily available at diesel engine supply stores.
When silicates present in antifreeze drop out, they build up and form a gel. This is called silicate dropout. A number of things can start this process: high silicate levels from incorrect antifreeze concentrations or improper use of coolant additives, impurities in very hard water, and severe engine temperature swings. “Boiler-scale” (calcium salts), especially present in used engines, present the largest threat of silicate dropout . It is therefore extremely important that used engines are thoroughly flushed. It is best to run the engine using only clean distilled water until much of the calcium salts have dissolved.
The main effects of the formation of this silicate gel are clogging of the heat exchanger, and engine overheating. Silicate gel buildup greatly reduces heat transfer to the coolant. When the gel coats the temperature sender, engine overheating can take place without notice. Silicate gel also carries abrasive particles to the water pump, where it wears away pump seals causing leakage and failure.
There are few effective methods for cleaning the gel from an already-clogged system. The heat exchanger must be removed and sent out for a thorough cleaning. The engine must be flushed with a caustic solution. The gel is not water soluble, so flushing with water alone will not work.
When using “Extended Life”, or “Low/non Silicate” anti-freezes, be careful NOT to mix with higher silicate antifreezes or hard water.
Use of too strong of an antifreeze solution can hinder heat transfer from the engine, and promote silicate dropout. Pure water conducts heat better than antifreeze and corrosion inhibitor; therefore, the addition of antifreeze or other chemicals reduces the water’s capacity to draw heat off the engine. A 1/3 solution is recommended so that no additional corrosion inhibitors need to be added.
Warranty
PPT/Monitor Products, Inc warranties the components in this kit against defects in material and workmanship for a period of two years from the date of original purchase.
All obligations and liabilities under this warranty are limited to repairing or replacing at monitor products option any components returned freight prepaid to our offices and found defective. No liability is assumed for indirect cost relating to labor charges or other indirect consequential damages.
The warranty does not cover units that have been used for commercial or racing applications, nor does it cover damage due to corrosion or freezing.
Money back guarantee
All PPT/Monitor products offer a full refund of purchase price for kits returned within 30 days of shipping date. Authorization to return kit must be obtained in advance. Kit must be returned in original box and be in unused and undamaged condition. If not, repair charges will be deducted from refund.
Shipping instructions
Any component returned to PPT/monitor products for whatever reason must be packed very well and is returned freight prepaid. Heat exchangers, due to their copper alloy construction, are especially easy to damage and must be carefully packed if shipping damage is to be avoided. Any shipping damage will be deducted from refund.

